Desk Reveal - Abby's Mini-Makeover Part I

>> 5.05.2014

My eight-year-old daughter is a junk collector. I've heard, "Can I keep that?" more times than I can count. She loves art, so there's always piles of paper, cut up boxes she pulled from my trash can, beads, random things glued to card stock, you name it, strategically placed all over her room. She's also very good at finding a use for anything that I would consider junk, and so the contents in and on top of her dresser, desk and night stand are always changing.

I was a lot like her as a child, and I really think that's all a part of being a creative little girl, so I don't mind so much that she does it, we just try to keep it under control. Once a month or so when she is in school, I will grab a trash bag and practically fill it full of art project remnants and junk, and then make her room pretty, and she usually is so happy that her room looks polished and put together that she doesn't even miss the now trashed junk.

A while back I went upstairs and snapped a picture of her desk as-is. I didn't add or take anything away, and this is how it usually looks on any given day.

It's not too bad, but definitely not a decorator's dream.

She has been asking me to paint her desk for a while now, and she wanted pink. This desk used to be in the living area of our old house, so it definitely needed a change in color. Here are a couple of the inspiration desks that we liked.
Original source not found.
Stiltskin Studios

I thought while I was changing the color, that we would work on de-junking and making her room a little more grown-up, so the desk project will be part one of a mini-makeover.

For those of you that follow my Facebook Page, you saw that last week I showed the refinishing process of her desk in real-time posts. You can see the process HERE. 

And after allowing it to cure for four days (because it's going to get a lot of use) here it is back in her room.


The wall art is from Target (circa 2012-13), as well as the lamp that somehow I got on clearance for $5!


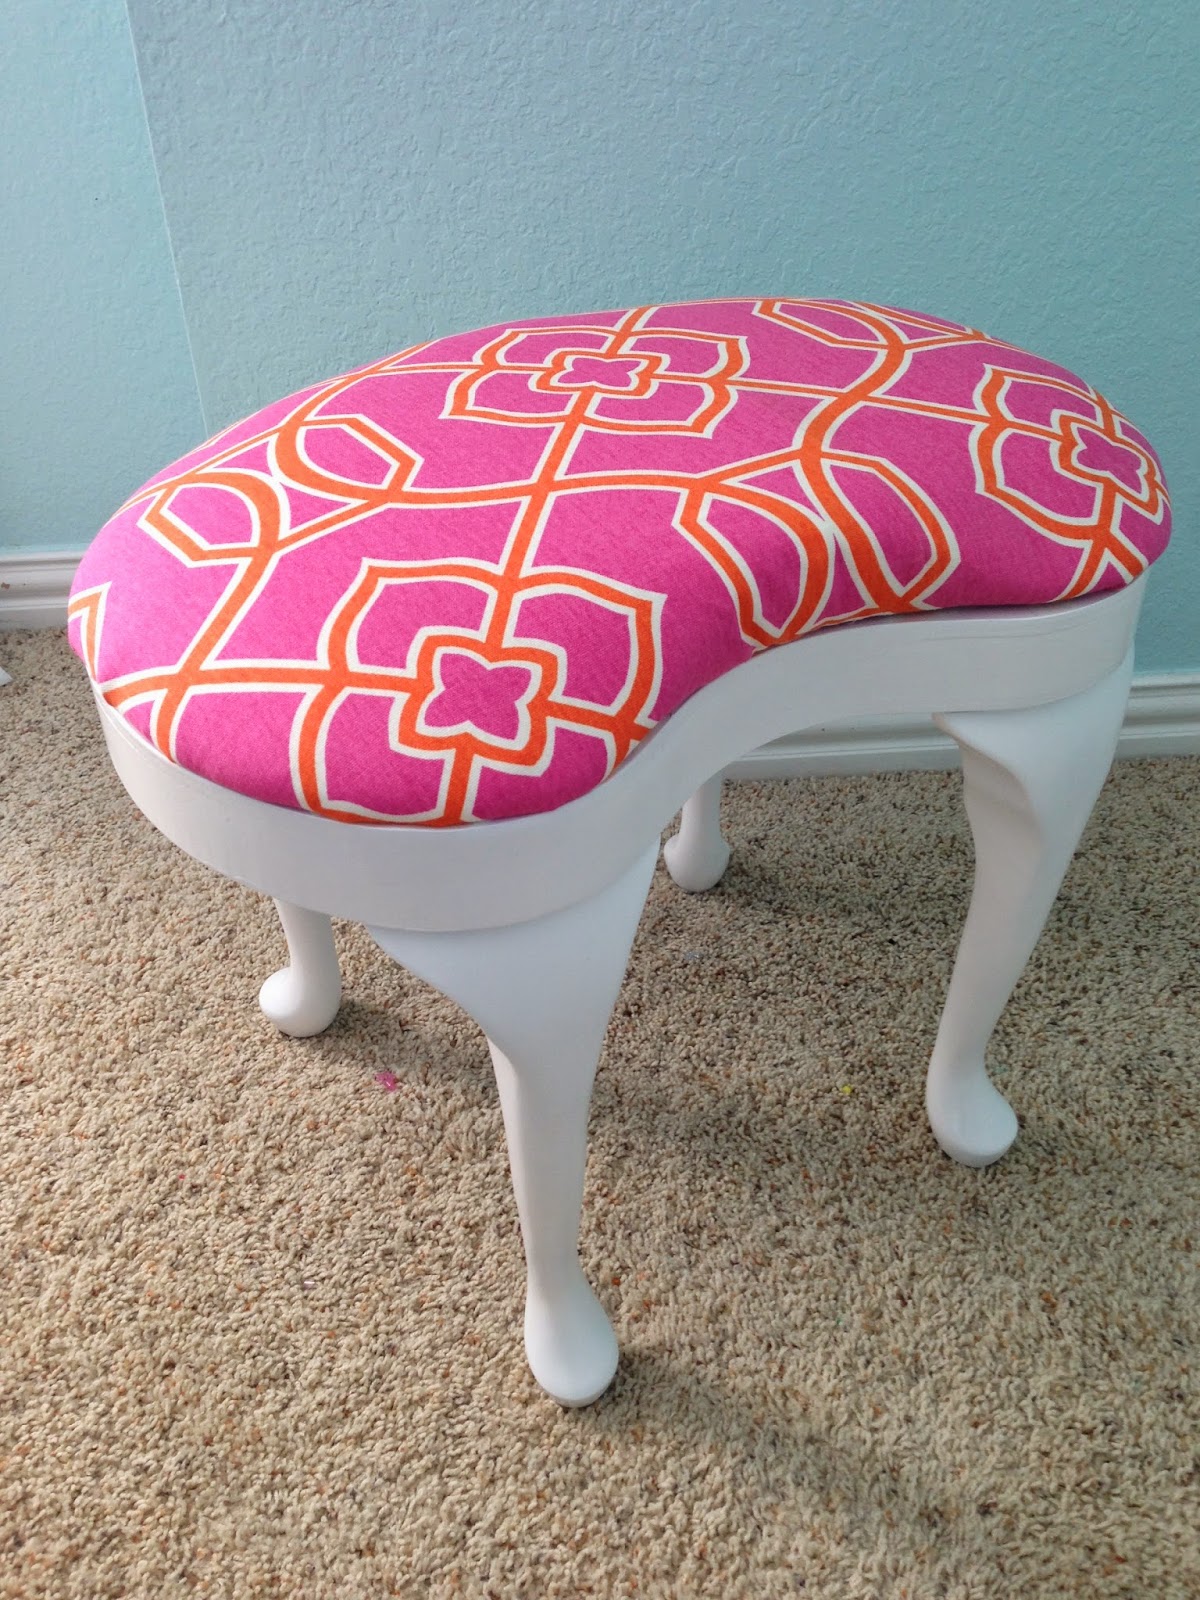
The stool was a find from a thrift store that I refinished. You can read about that HERE.

I am sure that in a few days this desk will be full of Abby's personal treasures again, but that's okay. I'll always have pictures to remember it by.  

Read more...

Stool Makeover

>> 5.02.2014

I'm doing a mini-makeover on my daughter's room, including refinishing a desk. I was looking for a stool to use in place of a chair in her room, and so I was super excited when I happened upon this guy at a thrift store for $10.

My sisters quickly named it the 'Butt Chair," and yeah, I guess it does kind of look like a fancy butt.


I removed the two layers of fabric and staples and primed the whole piece with spray primer. I didn't really like how the fabric covered the wood part, and although it wasn't meant to be exposed, I decided to keep the base visible. 

That meant I needed to fill in a few cracks to make it look a little more seamless. 


After it dried I sanded it down and did a few coats of white satin finish spray paint.

I then moved on to the bench. I had to create a new base to put the cushion on, so I took a 1/4 piece of plywood, traced the seat pattern, and then it cut with a jigsaw. I got some awesome fabric at Hobby Lobby for $6 a yard and used the existing cushion and stapled it on to the plywood.


I then cut the excess fabric off and hammered in the staples.


I then screwed the seat to the base and voila! No more butt stool!


Or maybe you still think it looks like a butt?

For kicks, here's the before and after:


I'm considering "dipping" the legs with pink or maybe even gold, but for now I'll leave it as-is.

Stay tuned for the desk reveal as well as the finished mini-makeover!

Read more...

Thrifty Thursday - Chotskies

>> 4.24.2014

It's probably "a little outside of nature's laws" how much I love thrift store shopping. Part of it is finding amazing things for a steal, but I also love finding the quirky and disturbing. It's just FUN. And as much as I love finding a good piece of furniture, I also love hunting for accessories.


On a typical trip to my favorite thrift stores, I always look for three things: Furniture, wall art/mirrors, and accessories, and if there's anything that usually always come home with me, its accessories.

Recently I went shopping for figurines to add to my collection. Figurines are tough, because they can easily look junky and outdated, like your grandmother's ceramic collection.
These are examples of things you should probably leave on the shelf. As cute as a ceramic pig wearing a flower mumu and green feather boa is, if you take her home with you, I will call an intervention. Same goes for creepy clowns and 1990's floral details on country pink swans. Leave them on the shelf. 

And then there's this guy. The sad thing was that when I went back a week later, he wasn't there anymore. Someone actually took him home. I mean...
I apologize if this image gives you bad dreams tonight.

But on the flip side, here are a few options that I did consider buying.

I liked the owl, he was a little small and the intricate detail was a little distracting to me. And I have too many owls to begin with. I also liked the bird. He was heavy, almost like a paper weight, but he had a blue stain on him and I didn't want to paint over him because it would mess up the pretty finish the bird already had. So I opted not to get him. I did end up getting the bunny though. The color wasn't a deterrent for me because I could easily paint him white which would freshen him up.

When buying figurines, worry more about the scale and form of the figure, and less about the color. A coat of white (or black, metallic or any other color for that matter) on a piece can modernize it and give it a second life.

These three pieces look outdated and definitely not something to fit a modern, fresh space.

But put a coat of primer and spray paint on them and they have a new look.


The little cat found a home in my daughter's room, the vase is being used on our mantle, and the blue whatchamacallit doesn't have a home yet. Speaking of, when you find something you like,  don't worry if you don't have a specific place in mind for it. If it's cheap and you have the space to store it, buy it!

There's nothing wrong with having an accessory stash. And I'm not just saying this to support my own addiction. Keep a collection of things that you love, and change it around every once in a while! If you don't have a closet, maybe dedicate just a shelf, or even a drawer, and keep those accessories handy for times when you are ready for a change and want to mix it up a little!

And for full disclosure, here is my stash.


These are things that are currently not on display in my house. Picture frames on the bottom, pillows and blankets (which should be on the bottom shelf but aren't) and accessories above.

So have you had success buying figurines? Do you have an accessory stash? I'd love to hear!

Read more...

Traffic Jam

>> 4.10.2014

The creative process for me goes two ways. I either am completely inspired and sure of the vision in my head, or I am a torn by the endless possibilities and avenues I could take with a specific project.

And right now my brain is a big ole messy traffic jam of ideas. Not just about one project, but about a lot of different projects, as well as the overall vision of several rooms in the house.

Source
So my goal for the rest of this week is to channel my inner Young House Love and make a master list of everything that I want to do in the house, room by room. It is a bit overwhelming taking a holistic view of the things that need to be done in your home, but I hope by putting the big picture on paper, it will help me clear up the traffic jam and allow my creative juices to flow as I focus on projects one at a time.

What about you? Have you ever made a master "to-do" list?


Read more...

Underwater Basket Weaving

>> 4.07.2014

I come from a family of junkers, which is great, because they help fuel my addiction. My mom passed along this magazine rack to me, and although I didn't care for it as-is, I decided to keep it for a future project.

It looks a lot like many teak vintage racks that sell for $45-$200 online, but this one appears to be a knock-off of sorts. It's not teak wood, the wood is a little rough, it has fewer rungs which makes it easy for things to slip through, and on the bottom it says "Max 06-07." Kinda seems like something a kid did as a high school wood shop project.


I sought out to upcycle this guy so that I could maybe fit it into the decor in my home. I thought it would be a great size and shape to put our music books in next to the piano, but I wasn't excited about all those exposed rungs and being able to see the potential mess inside the basket. So I decided to create a faux wicker basket using yarn.

I purchased $13 worth of yarn, and along with some yarn I already own, I designed out a rough color pattern and started weaving. I tied the yarn to a rung and then wound the yarn around each rung in a counter clockwise motion so that the rung was completely hidden behind the yarn. I went around the entire basket two or three times, weaving loosely, and then went back and tightened each row so that there was no give.


When I achieved the thickness I wanted, I tied off the yarn and went on to the next color, starting on the next rung. I also added a simple two-lined pattern with teal yarn to the off-white areas, which adds a little more interest.


This wasn't a difficult project at all, but it did take some time. I spent about 4.5-5 hours weaving, which I did off-and-on in small segments over the past weekend. I never learned to crochet or knit, but I had so much fun with this experience I really think I could get into basket weaving. Too bad I didn't take that in college.

Read more...

My First Bedrooms and Making It Personal

>> 4.03.2014

I took over my big sister's room when she went off to college. Murals were a thing in the 80's and before the room became mine it had a forest wall mural with a little squirrel. It was actually a photo blown up to the size of an entire wall, so you kinda felt like you were taking a stroll in a wooded park, but not. I was young, but I remembered loving that mural. I had a pretty white poster bed and a handmade yellow gingham bedspread (which I still have.) But sometime around 7 or 8 I decided that I wanted something more mature and girly, so I chose rainbows, probably because of Rainbow Bright. What eight year old in 1984 didn't love Rainbow Bright?


My mom mail ordered a rainbow mural, which rivaled the forest mural in shock value, and made me a rainbow bedspread and curtains. And then, because my mom is a collector herself, she bought practically every rainbow item in existence for my room to fuel my obsession. 


I loved that room, and I loved accessorizing it. I would change things up all the time, and there were probably a thousand thumbtack holes in the walls to prove it. I would always beg my mom to rearrange the furniture, and as I got older I would just do it myself. It was far from magazine worthy, but it was mine and it was ME.

Looking at these pictures instantly takes me back. I remember hiding the stuffed dog under my sheets  and then giggling in the closet when my dad would come upstairs to tuck me in and throw back the covers to find me not there. I remember playing with my cabbage patch kids and taking pictures of them at their pretend gymnastics meets. I remember drawing at the desk my dad refinished for me. And I remember laying on my bed and reading Babysitter's Club books for hours and hours.

Sometime around age 12 I wanted a change, and somehow thought that a french provincial theme was the way to go, complete with a french phone, fancy perfume bottles and a washing basin. (???) This was around the same time that I insisted that everyone call me AMANDA instead of Mandie, so that all makes sense now. It was definitely a period where I wanted to be more "grown up" and be taken more seriously. Looking back, it looks like I wanted to be treated like a grandma, but at the time, I was in love with that style.


I appreciate my mom letting me express myself and not squelch my creativity, even when it came to decorating my room. She probably didn't understand my insatiable desire to create and change things up all the time, but she let me, and I'm grateful.

Our rooms are personal. They don't have to be perfect, but they have to mean something. Let your kids take some ownership of the decor in their rooms. And take pictures of their childhood rooms. Because they will love looking back at where they slept and played, and the sights, sounds, and smells will rush back to them as if they were still there, giggling in the closet, waiting for their dad to come. 

Read more...

DIY Painted Planter and New Table

>> 4.01.2014

I have been looking for a large pot to put in our kitchen, and I recently found this one at a thrift store for $3.50.


It was exactly the size and shape I wanted, but the color was wrong, and I was hesitant about the stair step pattern that gave it a Santa Fe/Southwestern vibe. But I decided to take a leap and embrace the pattern and hold back my disdain for the Southwestern style - just this once.

I mean after all, some of my favorite designers and bloggers are infusing this style into their designs in a pretty amazing way, like HERE, and aztec prints and patterns are really on trend right now, so I decided to give it a shot.

I have heard good things about Martha Stewart's multi-surface paint, so I decided to give it a try. My daughter helped me pick out the colors and she chose "Surf" as the main color and I picked "Copper" as the accent.


With Scotch Edge Lock painter's tape, I taped the areas that I wanted to be copper, and then cut out the pattern with an exacto knife.


I then flipped the bowl over and painted, making sure not to paint the bottom. So this Martha Stewart paint is super durable and dries hard and fast, but you have to apply multiple coats. I had to do three coats of each color, and then some touch-ups on the copper after the third coat. But once it's on, it's gonna stay.


After the bottom portion dried, I peeled off the tape, and then reversed the tape, so that I could paint the copper areas. And somehow I neglected to get a picture of it, but I'm sure you get the idea. After that was dry, I took it out and gave it two coats of clear gloss for durability and shine.

Then I took my kids shopping for succulents and cacti. They LOVED picking out their own and my two older had messy fun helping me pot them. What kid doesn't like to get their hands dirty?


Here's the final product in all its modern Santa Fe glory.


I think I like it, but my kids love it, and that really matters.

And while I've got you here, I wanted to show you the new table and chairs we recently got. Our old table was a cappuccino colored pedestal table and chairs, and it was pretty beat-up.


Since our appliances and cabinetry are dark, we decided to look for something lighter this time, and NOT a pedestal. When I discovered this Crate and Barrel set on Craigslist for $290, I jumped on it.


We love the slightly more modern, simple lines and the lightness of the table, and it accentuates the brightness of that corner instead of creating a dingy and stark contrast like the old table did. The seat cushions are dirty and need to be replaced, but I actually think we might try to clean them and then replace them in a couple years when our kids are less likely to destroy them in 24 hours.

With the large drum pendant, light modern dining set, and our new planter, I feel like that corner of our house is really coming together.

What about you? Have you gone Santa Fe?


Read more...

About This Blog

  © Blogger template Simple n' Sweet by Ourblogtemplates.com 2009

Back to TOP