Thrifting Thursday - Margaret Gets a Makeover

>> 2.27.2014

I saw this piece one Friday at a thrift shop and thought it was interesting, but just couldn't visualize what I would do with it, so I passed it up. But all weekend I couldn't stop thinking about it. Not that I thought it was a once in a lifetime treasure that I would regret getting, but more that I was upset that I passed up a challenge. I know it had some sort of potential, I just didn't know what it was. So on monday I called to see if it was still there (like someone was seriously going to snatch it up) and it was, so I took it home for a whopping $17.


And then I let it sit in the garage while I figured out what to do with it. I knew I wanted to keep it as a peg board station, but definitely brighten it up and make it a statement piece for the playroom.

This is obviously a piece that was used in a classroom or pre-school, so it was pretty dirty. So first I cleaned all the gunk off it with goof-off and soap and water, and then sanded it down (except for the peg board area which would get ruined if I sanded it.) I primed it with spray primer, and then did a coat of oil based white paint over all the sections except the peg board and the bottom shelf. I then put two coats of Very Berry by Glidden ($3 paint sample) on the bottom shelf and then let everything dry.

I then moved the project inside so I could be with my family while doing the last part. Luckily my kids are old enough now that I don't have to worry about them getting into my project stuff, usually anyway. I pulled out my acrylic paint stash and picked out ten different colors, using various hues from the playroom color palate, so that part was free. I found the horizontal and vertical center and put tape down to help me keep track of the center and then took of the tape once I had a few of the lines painted. And then I just started painting lines, making sure that the lines were dry before I started a new line. As you can see in the picture, I jumped around the board to allow other parts of the board to dry. And because it is acrylic and I was doing really thin coats, they dried in a matter or minutes. I also reused the pieces of tape and threw them away once they got too painted over, which helped conserve tape.


Once it was dry I put a coat of polyurethane over the peg board to help it be a little more durable, and added baskets below and put it in its new home!


Here are the material costs for this project:

pegboard station - $17
paint (I already had everything but the Glidden sample) - $3
Tape - already owned
2 Baskets (50% off at Hobby lobby) -  $15

Total Spent: $35


This takes a lot of time and patience, and might result in a migraine once you are done, but the end result is so worth it!


Read more...

what the what?

>> 2.25.2014

I have a few time consuming projects that I'm working on for the playroom that I will be posting about soon, as well as a post about one of the things I love most in life: accessories. But until then, I wanted to post maybe the all-time freakiest thrift store item I have ever found.

And here's my beautiful (and blurry) daughter Abby to show us:

Whatever you do, don't look at the feet.

You looked at the feet didn't you?

Abby's going to kill me that I posted this picture.

Read more...

Playrooms and armpits

>> 2.24.2014

Last weekend while my hubby was on a campout, I decided to tackle the huge job of painting the playroom. I decided on Silver Drop by Behr for the walls, and English Channel for the accent wall. I chose to do the accent wall first because it was the smallest part and I knew I could finish it in a couple hours. So I knocked it out really fast and stood back to look and man, I LOVE this color. It does so much for the room, adds dimension and makes it a more interesting space.


And just as a reminder, here is what the playroom looked like before we painted:


So as I was standing there admiring the color, my eyes migrated to the hallway. The one part of the house that I really don't like. I feel like the hall is narrow, plain and boring and the half wall does nothing at all to help it. It's like the armpit of our house. So I figured while I was in the playroom making improvements, maybe I ought to really think about how to make this hallway more appealing, instead of painting it the same neutral color as the rest of the upstairs and calling it a day.

So my initial thought was to paint the half wall the same blue, thinking it would add some interest as well as create a less enticing canvas for Andrew and his creative friends to color on... because it may have happened once. Or twice. But once I painted the half wall I decided it would look even better to do the same thing to the entire hallway and create a two toned wall with a chair rail.


I really like how it turned out! The hallway is much more interesting now, and much less arm-pitty. I think I will create a gallery of the kids' art on the large wall to finish it out. Something like this:

The Pink Pagota
When Brian got home from his campout on Saturday he helped me paint the rest of the playroom, and now I have the huge task of styling the room and filling all those empty white walls! Can't wait!


Read more...

Playroom Mood Board

>> 2.21.2014

Here are some ideas I have come up for the playroom. Some things, like the small chest and rug I already have. Others, like the curtains, bookcase and growth chart, I am going to recreate for cheaper, of course. And items like the pillows, clock, and skyline prints are things I only wish I could have. But it's nice to dream, right? 

Speaking of dreaming, I didn't include the fort in the mood board, because that's something for further down the road. 

When I take a step back, this mood board looks a little mature for a 8,6, and 3 year old. But I feel like this is a fun color palate that will grow with them, and of course, when you include all of their toys and other fun wall art we are going to put up, it will be chock-full of kid personality.

This weekend we are going to start painting, and I have a lot of projects in the works, so I will have a lot to share in the coming weeks.

Do you have any big DIY plans this weekend?

Read more...

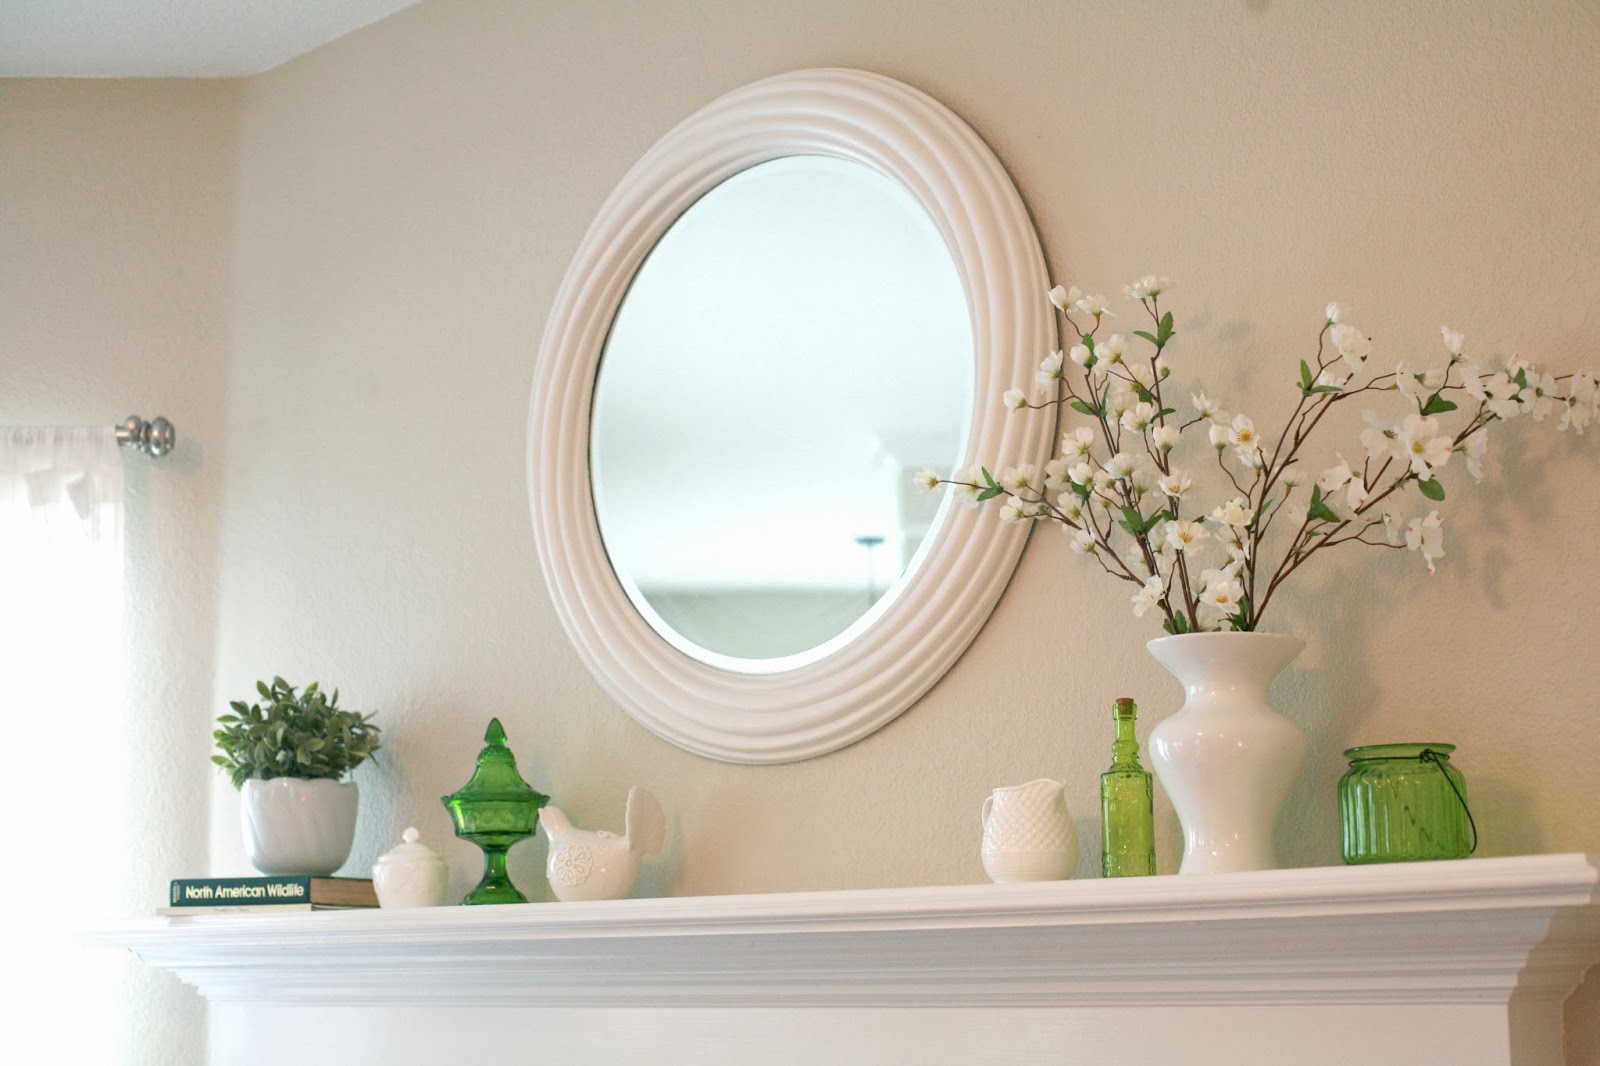
Top o' the Mantle, to Ya

>> 2.19.2014

Just like that, Valentines is gone and suddenly my very feminine Valentine mantle seems out of place.

I got all revved up to change my mantle for St. Patricks day, but once I really thought about it, I realized I never cared one iota about St. Patricks Day. In fact sometimes I purposefully don't wear green just to see the look of shock on peoples faces. And I also think that is one holiday that can look cheesy and commercial pretty quickly.

So instead, I decided to do a spring Mantle, with all white and green. I challenged myself to stick to a $10 budget and try to mostly use the accessories I already have. Cuz y'all, I have a lot of accessories.

To start the process, as I tend to do, I went through the house to see if there was anything that might work. I already had the white mirror, as well as a few other white and green accessories, but I was hoping for an interesting white vase and a few other things to complete the mantle.

So my shopping buddy (and favorite three year old) and I went to Goodwill and Salvation Army in Plano to see what we could find. I didn't find a white vase, but I did find this um, interesting vase for $1, that I decided to paint.


And I found this amazing vintage candy dish for $5 as well as two pieces of milk glass for $1 each. I don't always make out so well on my thrift store hunts, so I was really happy with my finds, and happy that I spent only $8!

I primed and spray painted the vase with gloss white, and I put everything up on the mantle and played around with it until I found an arrangement that I liked.

It may not be the most perfect mantle, but It's crisp and cheerful, and it makes me happy. And isn't that what matters most when decorating your home?


Have you started decorating your mantle for spring yet? I'd love to see a picture! You can post a pic on my facebook page.

Read more...

Ethel Gets a Makeover

>> 2.18.2014

*** I entered this project in the East Coast Creative Creating With the Stars Contest***
To view my project and the other entries, go HERE!


I scored this side table (I think I'll call her Ethel) at Salvation Army for $14 a month ago and honestly, I bought her for the price and not because I had any great inspiration, or even a place to put her.


But then couple of weeks ago I saw this adorable chest at Target, and although the bones of this piece are way cuter and on-trend than the side table I have, I thought maybe I could try to recreate the color and the detail, not with woodwork, but with paint.

Target.com

So I bought a paint sample of Behr Yellow Gold for the overall color and Behr Leisure as the accent color. The paint people at Home Depot and I looked at this picture on my phone and totally guessed at the color. I think we matched it pretty well!


This table is made up of both laminate and wood, so it was important to lightly sand and then prime this piece.


I always use Zinsser oil-based Cover Stain Primer with a small foam roller. It dries SUPER fast, and it's the best primer out there for a project like this, in my opinion. 
After the primer was dry I painted two layers of Leisure (the darker color) on the drawer fronts, and two layers of Yellow Gold on the body. 

Fun fact: Did you know that unlike Behr and others, the Glidden paint samples come in eggshell finish?  So you can actually do projects with these and not have to deal with flat paint. One tester of Yellow Gold was enough to do two coats over the whole thing, so it saved me money. If you do use a sample for a project, the key to making the paint stretch is to use a paint brush instead of a roller. 


I let it cure over night and then I started on the detail. 

My plan was to create the basic form out of cardstock and then tape around it with ScotchBlue EdgeLock painters tape. Man that stuff is amazing. 


 So I eyeballed a design (I hate measuring and I trust my eye) and lightly secured it onto the drawer front and then started taping around it. 
 But after the first few pieces, I realized my plan was going to take forever with so many corners, and I wasn't getting a clean enough edge. So I wised up a little and laid the tape and then lightly cut with an x-acto knife, which worked out so much better.  


This was the final design I decided on, and I repeated it on the other two drawers. 


 I pressed firmly around all the tape, making sure it was flat and secure against the wood, and then I did two coats of the lighter color, Yellow Gold, over the fronts with a paint brush. 


I let it dry for a couple hours, and then I removed the tape, which exposed the darker color underneath. I also did a coat of polyurethane, let it dry over night and then added the original drawer pulls, which I kept as-is to save money. 

And here's the finished project. She's more like a "Lucy" now, isn't she?


Here's a side by side with the inspiration.  The best thing? I spent a total of $21.50 on this piece. Not bad, considering the inspiration piece from Target is $90! 


Love furniture makeovers? Check these out!

   
Pegboard makeover
vintage dresser

Red Bed

Look alike High Chair


Read more...

Playroom Dreaming

>> 2.17.2014

We have lived in our house for almost a year, and the first few months we were here I was really motivated and repainted (or hired someone to paint) almost every room in the house, aside from the laundry room downstairs and the entire living space upstairs, which includes a playroom and a hall.

 This is what our playroom looks like right now.


Oh, who am I kidding... Twenty minutes ago this is what our playroom looked like.


Certainly you can relate.

Anyway. It's a fairly large, narrow room with yellowish beige walls and a completely blank slate. You would think that would be a good thing, but I'm actually a little overwhelmed with what to do in there, since there are so many options!  And I've also been putting it off because that's a lot of walls to paint. But this week I have been getting some inspiration and I thought I'd share with you some of my (and my kids') favorite ideas.

See this empty corner here?

Brian and I were thinking of putting something big there, and so after some research, we came up with three ideas, and took it to the kids to see what they thought.

1. A stage like this:


or this:


2. An art/homework center like this:

or this:


3. A loft fort/playhouse a little like this:


or this:

or this:


And after reviewing the options, what do you think the kids picked?

Ding Ding Ding!

The Loft/Fort Playhouse

I'm really on the fence about this though. On top of it being a lot of work, it's a semi-permanent structure that would take up a whole corner of the room. Not that that space was being utilized very well to begin with, but once it's up, there's no moving it around, you know?

So we'll sit on that idea for a while, and in the meantime I am working on a color scheme and psyching myself up to paint the playroom and hallway upstairs. I want to go with a beigey-gray, and maybe even a navy blue accent wall on the back wall.

These are the colors I'm liking right now.
Later this week I'll share with you a mood board for the playroom, as well as some individual projects I've been working on for this room.

But in the meantime, do you think we are totally crazy for putting up a fort? Have you done something like this in your house? Tell me your thoughts!


Read more...

About This Blog

  © Blogger template Simple n' Sweet by Ourblogtemplates.com 2009

Back to TOP